This is an old revision of the document!
User Interface
click in the images below on the items for further informations

Project

Scene
The scene name received from Blender. With Inkscape it is always “Inkscape”.
This is also used for the filename when saving ild files.
Can be overwritten here.
FPS
Frames per second, as received from Blender
also controls the playback speed in ILD Render with Play Animation
Frame Count
number of received frames from Blender
Output Directory
selects the directory for saving ild frames
Save Files
exports the animation to .ild files. For every projector one file is created.
Naming scheme: Scene name_Projector_#.ild
Optimization

These options only affect the actual selected layer.
The actual layer is visible next to the Optimization caption and in the layer list.
Reduce - Points
the amount of deviation for how much points get deleted in order to reduce the point count
higher values = more points will be deleted
 probably one of the most used options to reduce the point count!
Gap Size
Graphics from Blender or Inkscape could sometimes contain very small gaps between lines.
There are not visible, unless you deep zoom in the graphic.
So two lines will be connected to one line if the distance between them is lower the “Gap Size”.
Color Reduce
controls how many points are deleted in gradients
smaller values → more color details & more points
Dot Remove
if selected short polylines will be deleted, the max. length is equivalent to the Gap Size
for example when using particles in Blender, put these on a separate layer and disable this option
Reorder Paths
if selected this option re-sorts the lines to minimize invisible/blanked laser paths
may be useful to disable this if you want full control over the order of a inksacpe drawing (for a writeout effect for example)


Visible Line Interpolation
controls the point density in visible lines, lower values = more points
Visible Line Interpolation - Nonlinear
if checked this option distributes the points in visible lines nonlinear, at the beginning and ending the points will be placed tighter
Nonlinear spacing:
this also means the brightness of the line is not constant, at the beginning and ending the line will be brighter
Note: this allows to reduce the point count in complex images, as there are less points necessary at the Corner Points

Linearspacing:
the brightness of the line is constant

Visible Line Begin Points
how many points to add at the start of a visible line
Visible Line End Points
how many points to add at the ending of a visible line
Blanked Line Interpolation
controls the point density in hidden lines, lower values = more points
Blanked Line Interpolation - Nonlinear
if checked distributes the points in hidden lines nonlinear, at the beginning and ending the points are placed tighter
Nonlinear spacing:
Linearspacing:
Blanked Line Begin Points
how many points to add at the start of a hidden line
Blanked Line End Points
how many points to add at the ending of a hidden line
Overlap Points
how many points to overlap when start and end of a line are the same
Corner Points
this controls how many points are added at the corresponding corner/angles on continuous paths
Add one point to all corner angles
add one point to all angles at Corner Points
Remove one point from all corner angles
removes one point from all angles at Corner Points
Polylines
displays the actual reduced polyline count from Blender / Inkscape for this frame
Points
displays the actual calculated point count from Blender / Inkscape for this frame
DAC Points
displays the calculated point count from the current frame for the actual assigned projector
Presets
here you can save all optimization settings for the actual layer to a preset file & reload them
Go to first frame
go to the first frame in the animation and display it in the preview & on the projector if laser output is enabled
Current frame
shows the actual frame number and allows to step through the animation
Go to last frame
go to the last frame in the animation
Play Animation
plays the complete animation in a loop
it's shown in the preview and on all assigned laser projectors
the speed of the animation is taken from the FPS setting in the Project tab
Projectors

Projector Settings
select here the projector for the following settings
DAC Family
select the driver category from which to choose the device (IDN, Beyond, …)
only shows the categories where devices are found
Device
the actual device for the selected projector
only shows found devices
Assign DAC to Device
assignes the selected device to the actual projector
Undo DAC
if a different device is selected but not assigned you can undo your change
Rescan DAC
reload the DAV drivers and searches for devices
only tries to search for devices with Enabled DAC Drivers
Scan Speed
sets the scanning speed in points per second
Intensity
sets the brightness for this projector
Size X
sets the width of the output image
with negative numbers the image is inverted
Size Y
sets the height of the output image
with negative numbers the image is inverted
Offset X
moves the image along the horizontal axis
Offset Y
moves the image along the vertical axis
Rotation
rotates the image
Display Testpattern
shows various predefined test patterns on the selected projector
only accessible when laser output is enabled
Testpattern Color
overwrites the color for the Testpattern
Warping
opens the dialog for FFD warping
best used on curved surfaces
Projection
opens die dialog for perspective corrected warping, allows with just 4 control points a perspective correct warping
one of the fastest options to match projectors on planar surfaces!
Warping after geometric Correction
if checked applies the warping after the calculation of the geometric corrections (size, shift, rotation)
Reset All
resets all projector values to their default values
the Scan Speed is not altered by this
Colors - Upper Limit
adjusts the maximum value for the corresponding colors
for Beyond keep this at 255, as color training is done inside Beyond
Colors - Lower Limit
adjusts the minimum value for the corresponding colors
for Beyond keep this at 0, as color training is done inside Beyond
Blankshift
adjusts the Blankshift (color shift) for the colors
for most diode projectors this will be -3 to -5 points
for Beyond this setting has to be 0 !
Config

Point Size
sets the point size in the Preview Window
Line Size
sets the line thickness in the Preview Window
Display Lines
if checked show visible lines in the Preview Window
Display Points
if checked show points in the Preview Window
Display Blanking
if checked show the hidden lines in the Preview Window
Show Navigation Tooltip
if checked shows the navigation tooltip in the preview window
Enabled DAC Drivers
enable the corresponding drivers in ILD Render
enable only the drivers you will utilize to speed up the start of ILD Render
Show Tooltips
if checked displays a short help text when hovering over options
About
- displays the various copyright informations
- displays the software license
- has a link to the ILD Render Homepage
- has a direct link to the support email address
Enable laser output
toggles the laser output
Note: with the ESC key the laser output is disabled
Layers
- displays the received layers from Blender / Inkscape
- allows to change the routing of the layers to different projectors
- allows to overwrite Custom Optimizations received from Blender
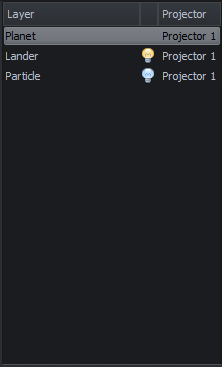
Layer Name
shows the name of the layer, this can't be changed
Custom Optimization
this column shows 3 different states:
no icon ⇒ this layer has no specific optimization settings received from Blender
![]() ⇒ this layer has Custom Optimizations settings (layer and/or objects have their own optimization settings) and these are ACTIVE
⇒ this layer has Custom Optimizations settings (layer and/or objects have their own optimization settings) and these are ACTIVE
![]() ⇒ this layer has Custom Optimizations settings (layer and/or objects have their own optimization settings) and these are NOT ACTIVE
⇒ this layer has Custom Optimizations settings (layer and/or objects have their own optimization settings) and these are NOT ACTIVE
to toggle the state active/inactive just click on the icon
Assigned Projector
the projector assigned to this layer, just click on this to change the mapping
Preview Window

- scroll wheel of the mouse zooms in and out of the image
- middle mouse button pans the image
- double click sets the zoom to default and centers the image
- right mouse button pops up a menu to Display Lines / Display Points / etc.